White Chocolate-Dipped Oreo Pops
Looking for something that is quick to make, hard to screw up, and absolutely delicious? Then these cookie pops are your go-to sweet treat!


Ingredients:
- 12 Oreo cookies [I recommend Double Stuf]
- 11 oz bag of white chocolate chips [Ghirardelli is my top pick and any flavor chocolate works for this recipe]
- 12 cookie sticks
- Parchment paper
- Sprinkles of your choice
- Ribbon of your choice
Step 1
Lay out the Oreos on a flat piece of parchment paper and separate the halves.
Press a cookie stick into the half with the heavier side of filling. This is where Double Stuf becomes handy because you have a lot more filling to work with and the cookie stick is more easily buried.
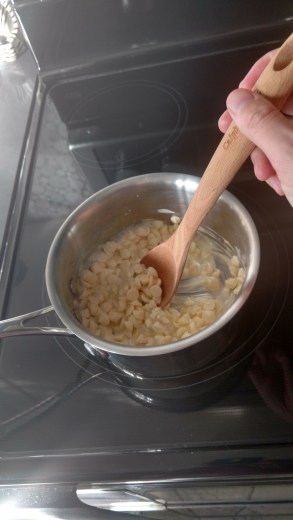
Step 2
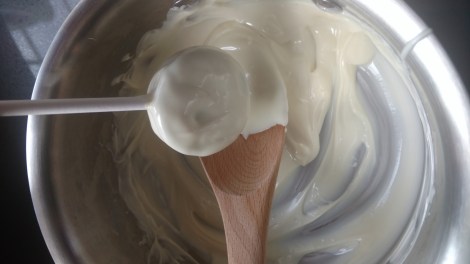
Melt a handful of chocolate chips in a saucepan on low heat, stirring continuously until the chips are completely melted.
This small batch of melted chocolate is going to be used as “glue” to ensure that the cookie stick stays securely in the cookie.
Place the other cookie half back on top and let the cookies sit for 5 minutes while the chocolate “glue” cools down and solidifies, securing the two halves together.


Step 3
Melt the rest of your chocolate chips in a saucepan on low heat. Stir constantly until chocolate becomes a smooth liquid and then remove it from heat.
Note: It is very important to keep a close eye on your chocolate because it can burn very easily if you leave it sitting still for too long in a hot pan. If your chocolate starts to boil, you have heated it for too long and remove the saucepan from direct heat immediately. Allow it to cool for a minute before proceeding to Step 4.
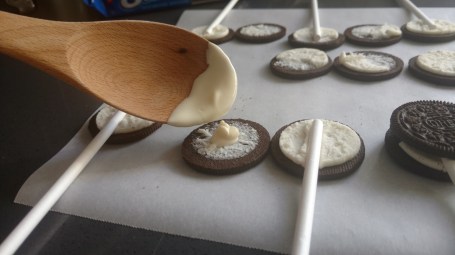
Step 4
Take one of your Oreo pops and dip it into the saucepan. Take a spoon and drizzle chocolate over the cookie, making sure to cover all angles completely. Once covered, lift the cookie pop from the pan and let the excess chocolate drip off and swirl it slowly to get an even distribution. Once satisfied with your cookie’s chocolate covering, lay it flat on the parchment paper and do not move it once it is placed.


Step 5
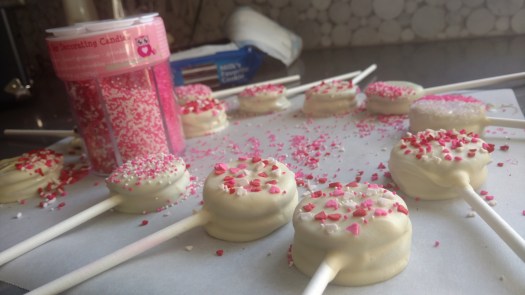
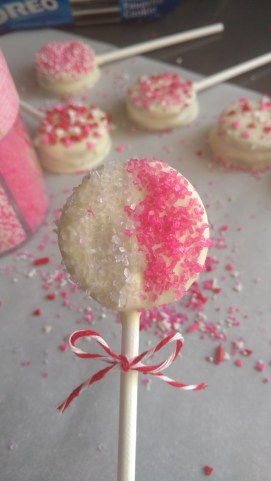
Once all of your Oreo pops are covered in chocolate and laying on the parchment paper, begin to sprinkle them immediately while the chocolate is still sticky.


Step 6
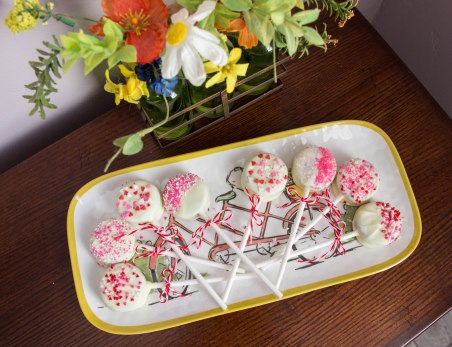
It took my Oreo pops about 30 minutes to completely cool [sitting out on the counter at room temperature] and for the chocolate to harden. Once the chocolate has harden they are safe to remove from the parchment paper and tie a ribbon around the stick.

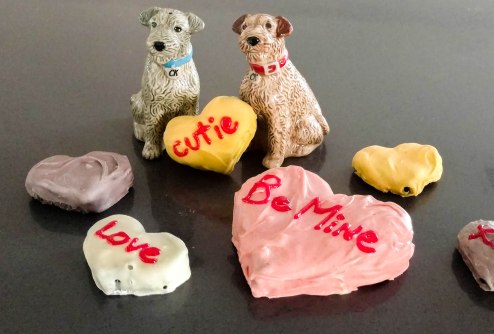
Oreo Truffle Conversation Hearts
This recipe will require a little more elbow grease than the quick and easy Oreo pops, but your hard work will pay off in a very deliciously rewarding way!


Ingredients
- 24 Oreo cookies
- 5 oz. softened cream cheese
- 11-14 oz. of white chocolate chips
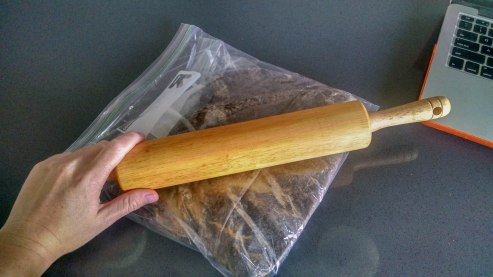
- 2 strong, sturdy gallon-sized Ziplock bags
- Rolling Pin
- Parchment Paper
- Heart-shaped cookie cutter [small, about 2in in width for bite size pieces]
- Food coloring [optional]
- Icing for writing [optional]
Step 1
Collect all of your Oreo cookies into your Ziplock bag. Make sure to squeeze out all of the air before sealing. Then take your bag of cookies and place it into your other ziplock bag. This is to ensure double protection, because Step 2 might get a little messy.


Step 2
Now that you have safely secured your cookies, take your doubled-bag and bang it against a hard surface – [clean] floor, tabletop, or counter. I smashed my bag against the tile floor and used a rolling pin to smooth out any remaining stubborn lumps. Whatever gets the job done. Your goal is to smash your Oreo cookies into a fine dust. I fell short of “fine dust” and achieved only “small chunks” which I later regreted because they were a lot harder to hand knead in Step 3. So stick to it and don’t get lazy like me – pulverize those cookies!


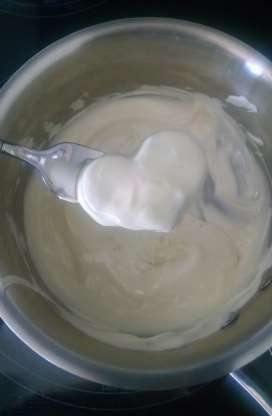
Step 3
Once you feel satisfied that your cookies are completely crushed, pour them into a bowl and add your 5 oz. of cream cheese. Hand knead the mixture until it is evenly combined. This took me about 10 minutes to really blend the two together. I also used the back of a large spoon to further smash any remaining cookie bits.


Step 4
Take your mixture and place it on a cookie tray that is lined with parchment paper. Attempt to flatten out the mixture so that it is evenly spread about 1/2 in. thick. Don’t stress too much about making it perfect because this can be difficult when the mixture is sticky. You will get a second chance to really smooth things out after freezing the mixture.
Step 5
Place the cookie tray in the freezer and freeze the mixture [dough] for about 45 min – or until the dough firms up enough for clean cutting.
Step 6
Take the dough out of the freezer and smooth it out with a rolling pin – remember you are looking for an even 1/2 in. throughout. Then take your cookie cutter and cut out the hearts from the dough. Place the cut-outs on a different plate and repeat Step 6 until all of the dough is used up.


Step 7
Stick your cut-out hearts back in the freezer for about 20 minutes to allow them to harden.
Note: It is important that your cut-out hearts are completely firm for when you go to dip them into your chocolate.
Step 8
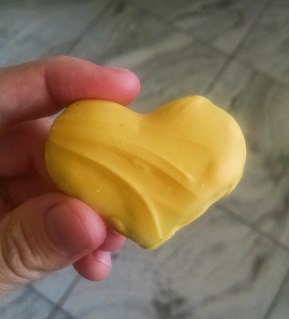
Melt your entire bag of white chocolate in a sauce pan over low heat. Make sure that you are constantly stirring so that you don’t burn your chocolate. Once your chocolate is completely melted and lump free, remove it immediately from the heat.
Step 9
Take only a couple cut-out hearts at a time from the freezer [so the rest don’t soften while you’re busy dipping others] and dip them into your chocolate. The method I used was placing the heart on top of the fork and using a spoon to drizzle the melted chocolate over the heart. This way, any excess chocolate will drizzle off the heart through the fork prongs.
Note: I used Ghirardelli chocolate and even when it was completely melted, its consistency was very thick and it made drizzling very hard. Look for a chocolate that is more watery in consistency when melted. This will make your dipping/covering process A LOT easier because the chocolate will more easily run off your cut-out hearts, leaving a smoother finish.
Also Note: If you want to make your chocolate colorful, only melt 1/4 to 1/3 of your chocolate at a time. Then add the food coloring to the melted chocolate, dip your cut-outs, and then wash your sauce pan out to repeat the process with another color.
Step 10
Allow your chocolate hearts to cool for about ten minutes on the counter. Then, when the chocolate hasn’t completely harden just yet [you are looking for a soft feel to the chocolate so that it is easily moldable], take a butter knife [or use your hands] and smooth any rough, uneven edges around the heart to get a cleaner finish. If you wait until the chocolate hardens completely, it will be a lot more difficult to get that smooth finish.
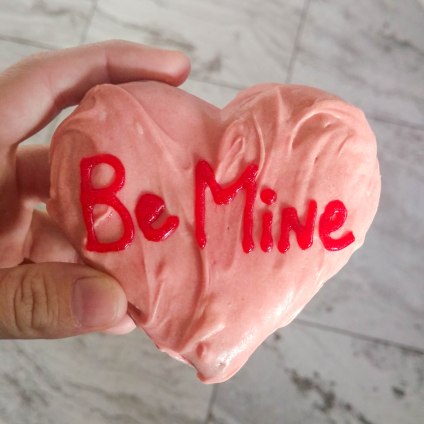
Once you are satisfied with your chocolate hearts, allow them to harden completely before writing on them with your choice of frosting. As many of you know from past attempts, writing with frosting is no cake walk! I recommend practicing a few lines of writing on parchment paper or any flat surface before writing on your chocolate hearts. But don’t fret! The great thing about these hearts is that when the chocolate has completely harden, the writing can be easily smudged off if you make a mistake and you can try again.